Recharging RV Air Conditioning. Can You Do It and How?
RVing during the summers can be challenging if you don’t have proper air conditioning in your trailer. Temperatures can rise relatively fast. And if you don’t have an adequate unit to cool down the interiors, you will not feel very comfortable.
But what to do when your AC unit stops working? You need to fix it as soon as you can!
In most cases, your AC might have run out of refrigerant. And you will have to recharge it by refilling it with the coolant.
Based on the kind of AC you have in your trailer and where you have it installed, it can be an easy task to get the job done. And some units require more of this recharging process as compared to others.
Let’s find out how to recharge your camper’s AC.
Table of Contents
How To Recharge Your RV’s Air Conditioner?
 Recharging RV air conditioning is based on some simple steps that you need to carry out.
Here are some steps that you need to carry out for this purpose!
Buy the coolant
 The first step you need to take is to buy a coolant or a refrigerant to fill in your AC. But before that, you will have to determine which kind of coolant to use.
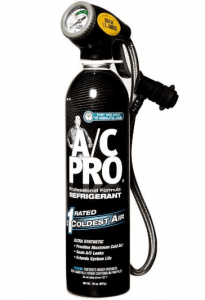
You can find it out by going through the owner’s manual or reading the name and type on the nameplate. Among the most popular refrigerators for RV ACs is ACP-100 AC Pro.
With this coolant purchase, you will also receive a gauge to measure your coolant and its temperature.
Cut the power supply
The next step is to locate the breaker panel on your trailer and turn the AC’s power supply off. You have to do this, otherwise, be prepared for a shocking jolt of electric current out of nowhere.
Whenever you are dealing with any appliance in your RV, it is better to turn off its power supply. Or else you might end up disturbing the primary power source and its circuitry as well.
Remove the cover

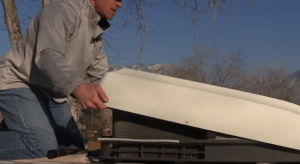
When you are done with the power supply, it’s time to start working on your AC. You can begin by removing the plastic cover carefully.
What steps do you need to remove the cover? It might differ from one AC model to another. You can consult your owner’s manual again to be certain.
You can assess the external unit of your AC and look for any clamps or clips that are holding the casing on the unit. Be careful because you don’t want to break the clamps of your case.
Also, make sure that you don’t have any wasps or bees entering or exiting your unit. If that is the case, then you need to take precautionary measures for a hive.
It is something that frequently happens with rooftops units. You need to be careful and remove the hive from the inside of the unit.
Check the coolant levels
The next step involves recharging RV air conditioning. Before you can add any coolant, make sure to check the gauge and see the current level.
Again, different models have different processes and techniques to check the coolant level. In most of the models, you can’t check the level that easily, and you will have to install a line tap.
This line tap is just a small system that opens the coolant line and allows you to attach the gauge to it directly. Keep in mind that this system will put a tiny hole in the coolant line of your AC, and you have to be cautious while doing it, or you will end up causing more damage
If you are not that sure, it would be better to take your RV to a professional and get this done correctly. If your gauge has indicated that if the coolant evaporation temperature is around 30 to 40 degrees, then your coolant might be running low.
You have to be sure about how much of the refrigerant your unit can hold. Therefore, you need to pour small quantities and then rerun the gauge check.
Test your unit
Recharging RV air conditioning is done, and it’s time to run a test. You need to allow it to run for a while so you can put on a movie, read a book, or munch on something during this time.
If your AC is not producing enough airflow or cooling, there might be some other problem. In case the same problem occurs again, then you need some professional assistance here.
If it produces the desired airflow and cooling, you have successfully recharged your AC, and it’s time to carry on with the other stuff you were doing.
Common AC Problems
If recharging hasn’t worked and you are far away from any professional assistance, you need to diagnose your AC for some other issues.
The filter needs to be cleaned
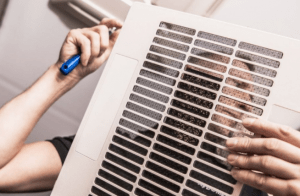 One of the most common AC problems is that your AC filter has gotten dirty. If your AC is not throwing enough cold air to keep you relaxed in warm temperatures, you need to check your air filter.
Dirty filters can cause issues in the electrical circuits and can cause problems in the circuitry and regular functions of your AC.
They can also cause the spread of germs as well as allergens within your camper.
You need to do this regularly to ensure that none of this happens and your AC continues to perform efficiently.
AC freezing up
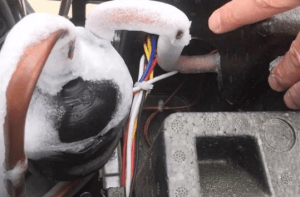 If your AC is freezing up, it can mean several different things. You need to run a few checks to see why the AC is freezing up.
Maybe the furnace filter is dirty, or perhaps you have your return girls or vents closed. Perhaps the coolant is low, or you have set your thermostat to low.
AC can freeze up if your blower motor inside the furnace is not working. Or maybe the board is not sending power to the blower inside the furnace!
If you have a plugged-up metering device next to the motoring coil, it can also cause your AC to freeze up, and so does a plugged-up evaporator coil.
We would suggest that you begin troubleshooting these issues only if you have plenty of experience in repairing these appliances or you have been doing it in your DIY projects.
Otherwise, you need to seek immediate professional assistance to result in the freeze-up problem.
Air leakages
Air leakages are another type of AC problem due to which your AC is not coupling or putting up a powerful airflow. There might be some leakage in the air duct system of your AC.
The leakage goes right through the duct system, and it results in a reduced air output. You can check any air leakages and try to tape the holes with aluminum foil taping.
Check your “Freeze” plugs
If you are done checking all the problems mentioned above and if performance is still below par, you must check your AC’s wiring. Several factors can influence the wiring in your AC.
It might be caused by water damage, damaged wires, overheating, or wearing out. Maybe one of the two plugs in your AC has stopped working.
These plugs will have a temperature probe with them, and they connect to the board. You can replace these plugs and go with the new ones.
How to maintenance AC
AC maintenance is essential, and most RV owners don’t give much importance to it. For your regular maintenance keep in mind the problems mentioned above and carry out the following steps frequently.
Cleaning the filter

Make sure you clean your AC filter regularly. Cleaning won’t take much time, and it’s the first step that will allow your AC to keep working as it should.
You need to check both the filters in the inner and the outer units. Cleaning the filters with the help of your vacuum, especially a handheld vacuum, will be convenient and straightforward.
It is better to clean your air filter right at the beginning of your camping seasons and right at the end of it. As soon as it starts deteriorating, you need to replace it with a new one.
Clean the conditioning compartment
In most cases, these camper units are placed on the roof. It means they are exposed to different elements.
Hence, you need to clean the upper conditioning compartment, primarily focusing on the motor, evaporator coil, condenser coil, fluid lines, and fan.
These components can get dirty over time, and you need to clean them thoroughly for your AC to work. You have to be careful because these coils can get debited or dented quickly, and similar is the case with fluid lines, fan, and motor.
Conclusion
 When the hot seasons come in and you plan to go RVing, make sure your AC is in top-notch condition. You don’t want to be left stranded out there on the campsite and in a warm temperature with your AC out of order.
You must run maintenance checks before leaving the site. If you can handle these repairs, do them or seek professional help if you can’t take the entire process independently.
But do all of that ahead of the season and then run a check at the end of the season. This way, you will be able to keep your AC running in top condition at all times.

I`m a current Law Enforcement Officer working within the Counterterrorism Bureau in New York State. I have been Camping for over 20 years. My styles of camping include tent, car, truck, van, and RV travel trailer. I have a YouTube channel where I teach all types of camping with an entertaining method: https://youtube.com/@TheSmallsRVAdventures


![How To Unclog RV Black Tank? [Step by Step]](https://camperlife.co/wp-content/uploads/2021/03/rv-black-tank-768x431.png)


![Best Teardrop Trailer Interior Ideas [With Pictures]](https://camperlife.co/wp-content/uploads/2022/02/nucamp-tag-xl-interior.jpg)