How To Fix A Sagging RV Slide-Out: 4 Causes and Troubleshooting
How to fix a sagging RV slide-out? I have been asked this question many times by different RV owners during my twenty-long camping experience. If you are also looking for a solution to this problem, you are the right blog post.
I have decided to put an end to this issue and provide my readers with the reasons and a 5-step solution guide for RV sagging slide out. So, without any delay, let’s head on to the next section!

Table of Contents
The Repercussion of an RV Sagging
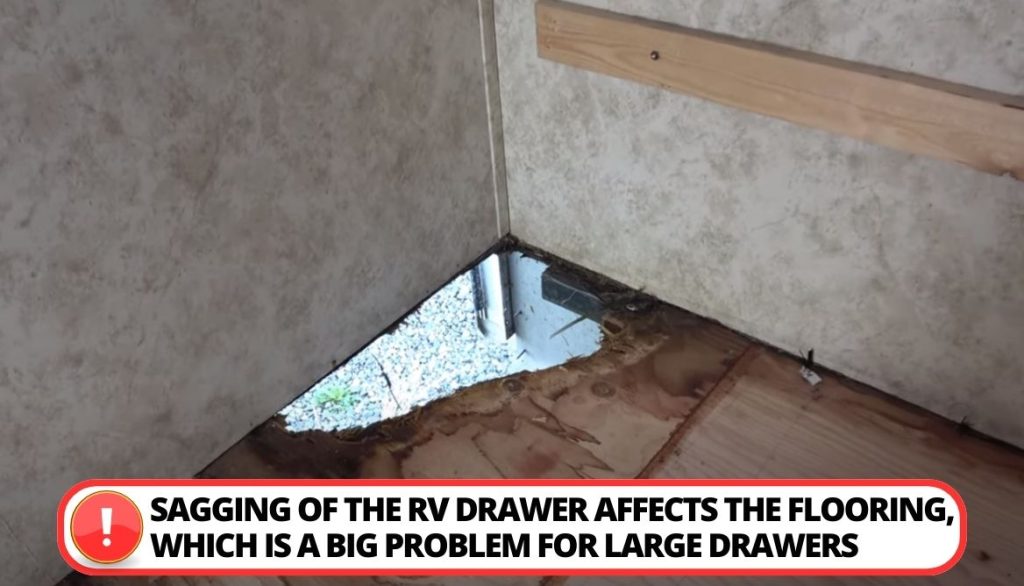
I am an RV user and I know dealing with a sag in RV slide-out is more than an eyesore. When I faced this issue I got to know that sagging in my RV’s slide-out has also messed with my flooring, which is a big deal, especially for larger slide-outs that expand the main living area.
- The misalignment I faced with gaskets and mechanical parts led to roof leaks, causing water problems inside the slide-out.
- To make matters worse, wind-driven rain infiltrated the subceiling, resulting in more significant ceiling damage throughout my RV. Thus, it became a headache that went beyond appearances.
So, from my personal experience, I can tell you it’s bad and you need to fix it as soon as possible. Now, let’s learn about the reasons behind this issue.
4 Culprits for A Sagging RV Slide-Outs
Listed below are some of the culprits that I found for a sagging slide-out:
1. Wear and Tear
From my own journeys, I’ve learned that a major cause of a sagging slide-out is the wear and tear that naturally comes with the territory of RV adventures. So, even the sturdiest vehicles may encounter these challenges, ultimately resulting in a sagging slide-out.

2. Foreign Objects
You would be surprised to know foreign objects can find their way to the bottom. These objects exert extra pressure on the slide-out mechanism, which leads to a noticeable sag.
3. Need for Additional Support
I’ve also found that the reason for a sagging RV slide-out is often the requirement for extra slide-out supports. Some RV manufacturers do not provide adequate support for the slide-out, ultimately leading to a noticeable sag over time. It’s a reminder that, in some cases, a bit of extra support can go a long way in preserving the longevity of your RV’s slide-out.

4. Slipped Brakes
The last but most important reason I’ve encountered with my RV is that the slipped brakes are responsible for keeping the arms extended, causing a gentle retraction of the arms and resulting in a sagging slide-out.
How To Fix A Sagging RV Slide-Out: 5-Step Procedure Listed!
Here is the helpful 5-step guide that I followed to repair the slide-out mechanism and get everything back on track. Let’s have a detailed look:
Step 1: Calculating My RV Slide-Out Sag
If you think there might be sagging in your RV slide-out, a good way to check is by measuring the space from the side of the RV to the outer edge of the slide-out wall.
- Do this measurement at both the top and bottom for accuracy.
- If these measurements aren’t equal or very close, then it is an indication that you might be dealing with some sag.

Interestingly, new RVers might get concerned when they observe the slideout visually dipping away from the camper, especially at the top. Don’t worry, as for this issue you need to check for levelness inside the slideout on the floor and then examine the top of the slideout for level.
If the RV and the slideout floor are level, and the top is only slightly off because it’s tipping away from the camper, don’t panic! This design could be intentional, helping with water drainage. In such cases, no adjustments are needed.
Step 2: Attempting to Reset My RV Slide
For new RVers, it’s quite important to understand that a slideout’s weight. I found that the structure is made in such a way that it gets support from the lip present at the upper part of the slide-out which applies force against the header beam.

- When the mechanism extends from the bottom of the slideout, the lip touches the header, making the outer edge of the slideout tilt upward.
- This effectively shifts the weight of the slideout mechanism, allowing it to push outward without carrying the load of the slideout.
- The outside edge of the interior floor may sag over time from supporting the slideout’s weight, leading to a drop on the inside edge of the slideout.
The best way to resolve this sagging issue is to run the slideout in and then back out again. This action can potentially reset the arms and fix the sagging.
Step 3: Inspection of RV Hardware
I found that the bolts for adjusting my slide broke when they had to bear more weight than they were meant to handle.
If you encounter any such cases, then I would recommend you get in touch with a technician who could replace or weld new hardware effectively.

Step 4: DIY Adjustment with Caution
My RV was not under warranty coverage so I decided to take the plunge. Still, I would recommend that adjustment should only be done with proper cautionary steps.
For DIY adjustment I looked at the RV owner’s manual for instructions and also watched plenty of videos to understand how adjustments would impact my slide-out performance.
Adjusting the Horizontally and Vertically Sagging RV’s Slide-Out
To make adjustments both horizontally and vertically for the slideout, I followed these steps:
1. For Horizontal Adjustment
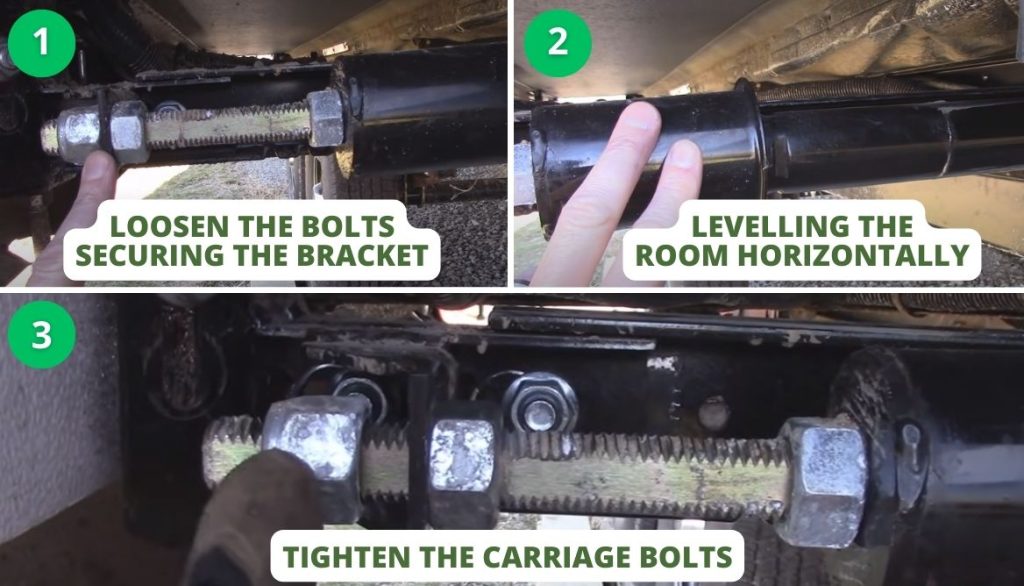
For adjusting the horizontally sagging RV slide, I opted for these steps:
- In the start, I loosened the carriage bolts of the bracket found at the end of the slide-out guide tubes.
- Next, I aligned the room horizontally by either pushing on the outer sidewall or using a prying tool.
- In the final step, the sag was corrected, then I tightened the carriage bolts to tighten the position.
2. For Vertical Adjustment
For adjusting the vertically sagging RV slide, I performed these steps;
- Firstly, I loosened the carriage bolts. They are present at the end of the slide-out guide tubes.
- Afterward, I adjusted the vertical adjustment bolt to position the room height to remove the sagging.
- Lastly, I tightened all the bolts once the desired position was achieved.
Step 5: Giving an RV’s Slide Out Support
To ensure the sag is repaired and to prevent further issues, I purchased slide-out stabilizers. These are affordable, easy to use, and function like jacks, taking the weight off the top support bar in the slide-out and reducing the possibility of sagging.

RV Maintenance Process
If you are an RVer and do not want to face problems on the road over again then you need to follow the given maintenance schedule that I follow as well:
- Make a check of wheels and tires before hitting the road.
- Check the roof for any kind of debris.
- Retract slides and also lubricate the slideouts 2 times in 6 months.
- Check out for batteries and regularly check for battery charge every time before taking a ride.
If you find any major faults in your RV like slideout mechanism problems, tires and suspension issues, generator troubles, or any kind of water leakage problem then I would recommend you to visit a professional technician for an easy fix.
For more insights, check out this helpful video.
What’s the Expense of Repairing a Camper Slide-Out?
Before diving into pricing, I want you to understand that the price of repairs depends on the issues. Typically, the cost of repairs relies on the specific parts that require replacement and can range from $500 to $2000.

If you want to reduce this hefty amount then the best option is to diagnose the issue, and if possible undertake the repairs yourself. However, if you are unable to solve the problem then get help from any RV technician.
Overview Of People’s Experience With Sagging Slide Outs
Now, I am going to pen down the review of RV owners who experienced a similar sagging issue with their slides. Let’s see what they said:
FAQs
Can RV slideouts be adjusted?
Yes, RV slideouts can be adjusted. You can do it by measuring the amount of sag, running the slide in and out, and inspecting the adjustment hardware. If the issue persists then contact an RV technician.
Should I brace my RV slide out?
No, it’s not recommended to brace your RV slide-out unless advised by the manufacturer. Seek guidance from the manufacturer or a qualified technician for specific concerns.
What are the signs of a sagging RV slide-out?
Signs of a sag in the RV slide-out include uneven alignment, visible gaps or misalignment when extended, difficulty in smooth operation, and potential issues with the levelness of the RV or flooring within the slide-out area.
How can I prevent my RV slide-out from sagging?
To prevent RV slide-out sagging, conduct regular inspections, ensure level placement, use slide-out supports, and maintain adjustment hardware vigilantly.
Conclusion
Summing up how to fix a sagging RV slide out, the problem could be due to various factors such as misalignment, wear and tear, or mechanical problems.
To resolve this issue, consider measuring and adjusting the slide-out, inspect for any worn-out components, and ensure proper alignment. If the problem persists, seeking assistance from a professional RV technician is recommended.
Have you encountered and resolved sagging slide-out issues in your RV? Feel free to share your experiences in the comments below!

I`m a current Law Enforcement Officer working within the Counterterrorism Bureau in New York State. I have been Camping for over 20 years. My styles of camping include tent, car, truck, van, and RV travel trailer. I have a YouTube channel where I teach all types of camping with an entertaining method: https://youtube.com/@TheSmallsRVAdventures


