Duo Therm By Dometic Wiring Diagram: 7 Useful Tips
Are you looking for Duo Therm By Dometic Wiring Diagram? If so, then you’ve come to the right place. This blog post is designed to provide a step-by-step guide to installing your RV’s heating and cooling system using the Duo thermostat wiring process.
Here, you will also read about the following:
- How to wire a Duo therm thermostat
- The 7 best tips for this wiring process
- Safety measures during working.
Table of Contents
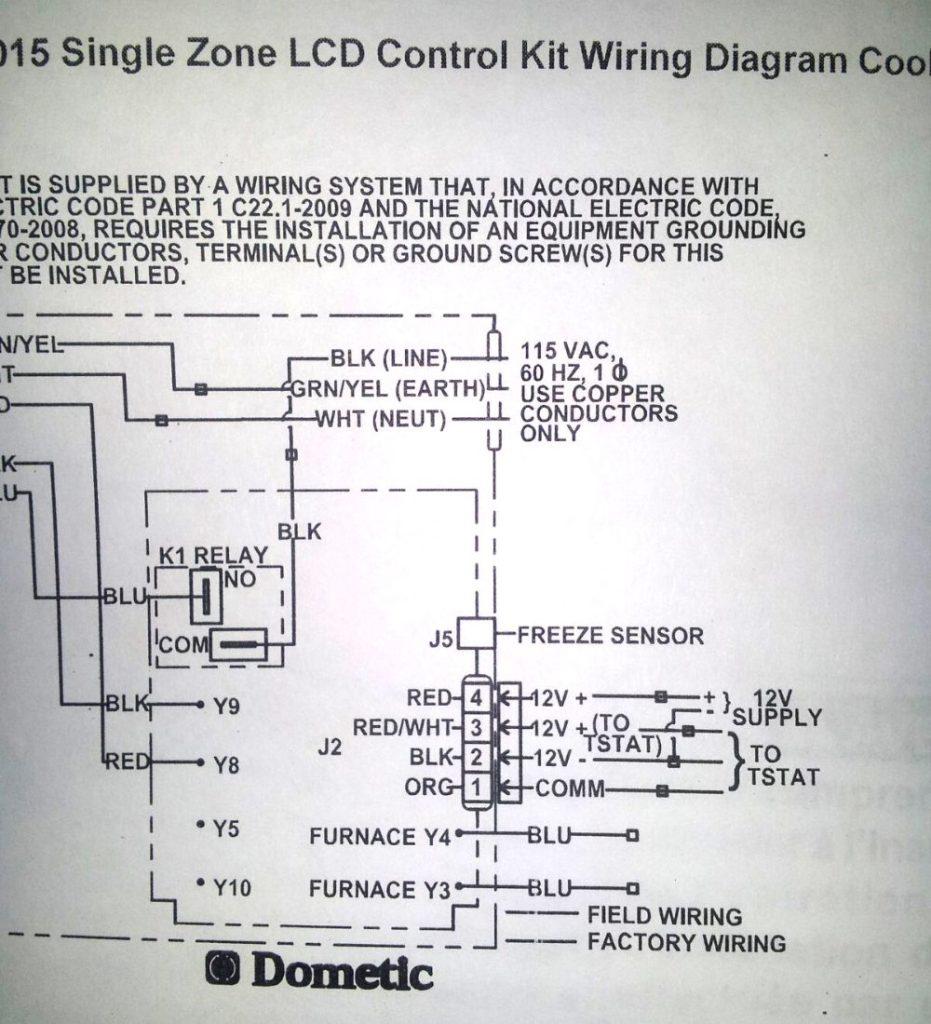
Duo Thermostat Wiring Diagram: Find Your Diagram!
Are you in the process of wiring your RV’s heating and cooling system? If so, you must know the Duo Therm Thermostat Diagram.
It is important to note that the wiring diagrams for different models of Duo Therm thermostats may vary, so it is crucial to ensure that you use the correct diagram for your specific RV.
Take a look at the most popular Duo Therm thermostat wiring diagrams:

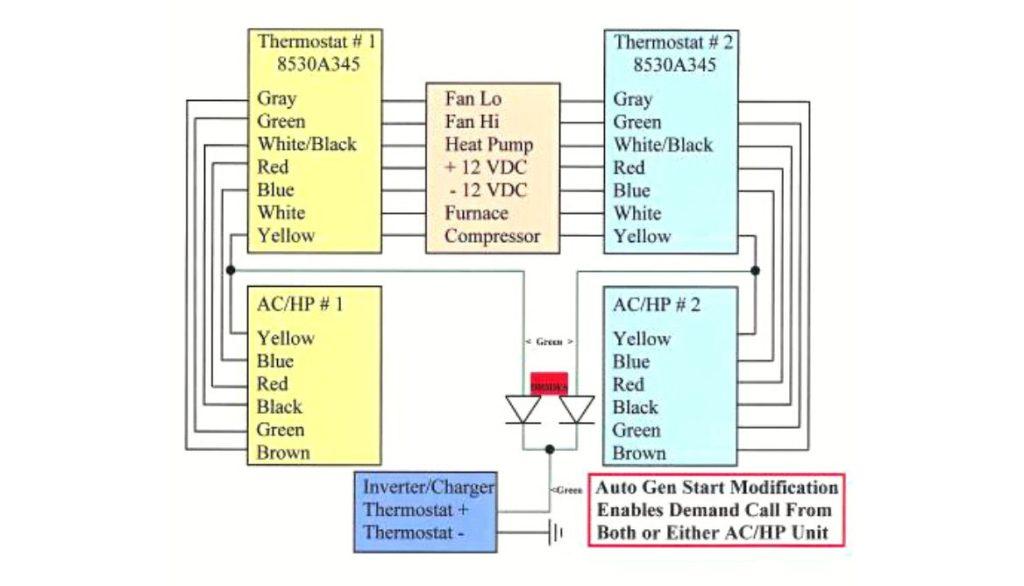
Duo Therm Dometic RV Thermostat Wiring Diagram: Alternatives Ways
If you do not find a suitable diagram upper you can also check your owner’s manual. Many RV of them have a diagram that may be more accurate than any available online. These manuals usually have the best wiring sketches, so check there before trying other sources.
How To Wire A Duo Therm Thermostat – Step-By-Step Guide
It is important to remember that wiring a Duo Therm is just regular wiring, nothing fancy or complicated. It should take some time to complete if you follow the instructions. It is best to go one cable at a time and ensure you have the right connections before moving on to the next cable.
Safety Measures
Wiring a Duo thermostat is a relatively easy task, but it is crucial to take the necessary precautions when doing so.
- All colored cables should upgrade and connect to the same color wire on the other end.
- The only exceptions to this rule are the gray and brown wires, which should be connected.
- One white connection should be left empty.
Сomplete Step-by-Step Guide for Duo Thermostat RV Wiring
Here is the complete step-by-step guide for Duo thermostat RV wiring:
- Before starting the installation, it is crucial to turn off all power.
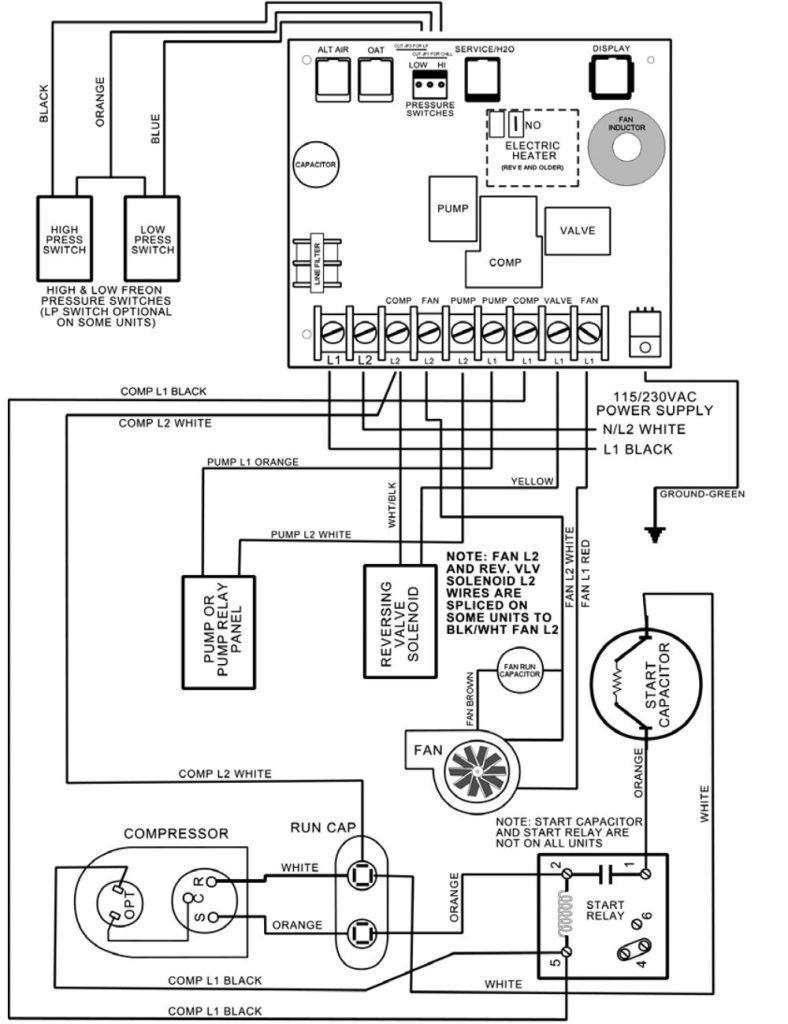
- The Blue, Black, and Yellow Soft start wires should be routed into the electrical box, and the Brown and Red Soft start cables should be directed to the top of the compressor.
- Next, connectors should be crimped onto all Soft start wires.
- Then, the milky compressor cable should be disconnected from the “C” terminal and connected to the Blue SoftStart cable.
- The Black SoftStart cable should be connected to the terminal that the milky compressor cable was on.
- The Yellow smooth start cable should be connected to the HERM side of the Run Capacitor of a manual fan.
- If there is a second Red wire next to the red compressor cable, it should be disconnected and sealed with electrical tape.
- The blue compressor wire should be disconnected and connected to the red SoftStart cable.
- Finally, the female flag end of the 4″ Pigtail should be connected to the terminal that the Blue Compressor cable was on, and the Brown SoftStart cable should be connected to the female side of the piggyback connector.
Wiring The Duo Therm Thermostat – 7 Unique Tips
Let’s look at some pro tips for the Duo thermostat.
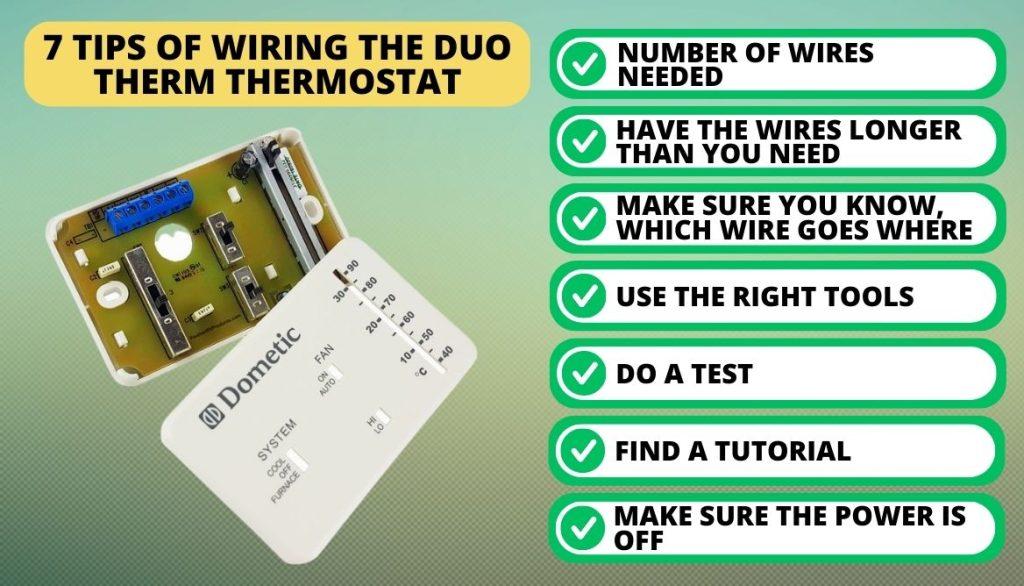
1. Number Of Wires Needed
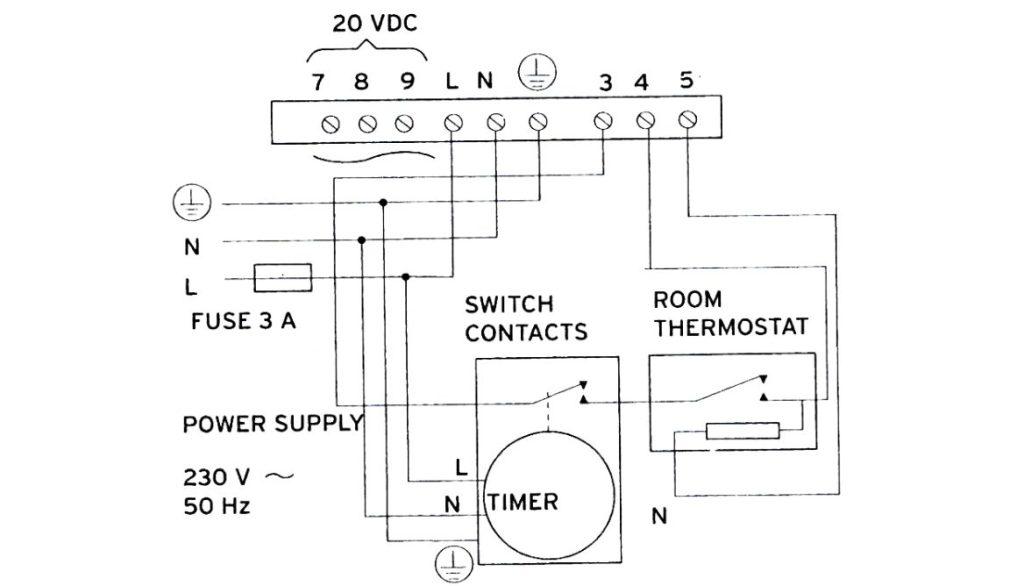
The number of cables you need to install your Duo thermostat depends on the type of heating and cooling system you have in your home. Generally, this RV wiring requires four cables for proper installation. These four wires are usually connected to a 24-volt transformer, which provides power to the thermostat. The cables should be labeled with as:
- “C” (Common)
- “R” (Reverse)
- “W” (White/Heat)
- “G” (Green/Cool).
It is essential to ensure all the wiring diagram is connected correctly and secured. You can either add or connect cable nuts or butt connectors for this work. Make sure to join the proper cable to each terminal.
2. Have The Wires Longer Than You Need
For any wiring or construction work, having extra cable to connect is essential. Adding more cables to the system can be risky, as it might interfere with other wires and create a hazardous situation. However, it is possible to remove the extra cable if needed.
Always double-check your work and test the new thermostat before turning on the power.
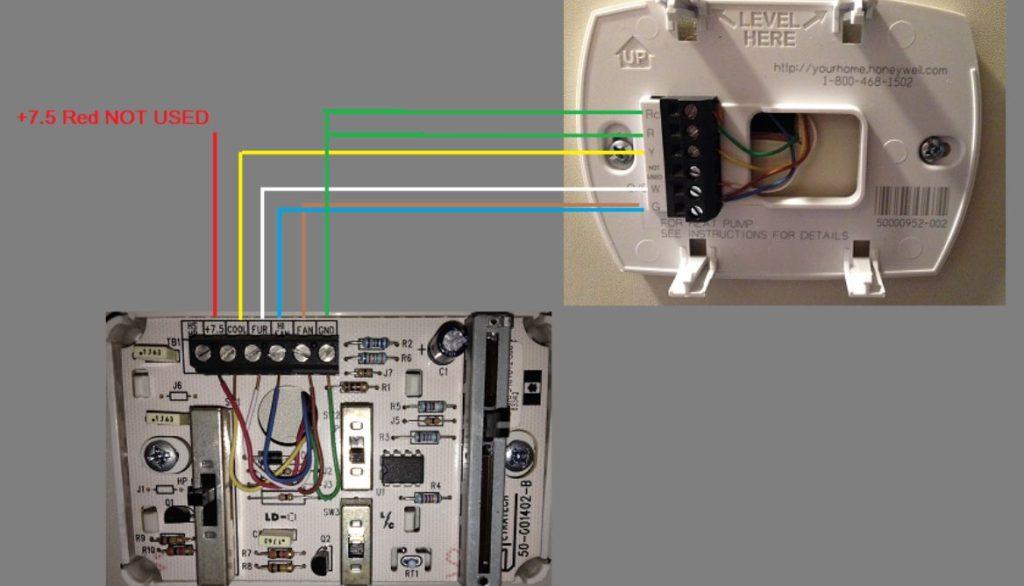
3. Make Sure You Know, Which Wire Goes Where
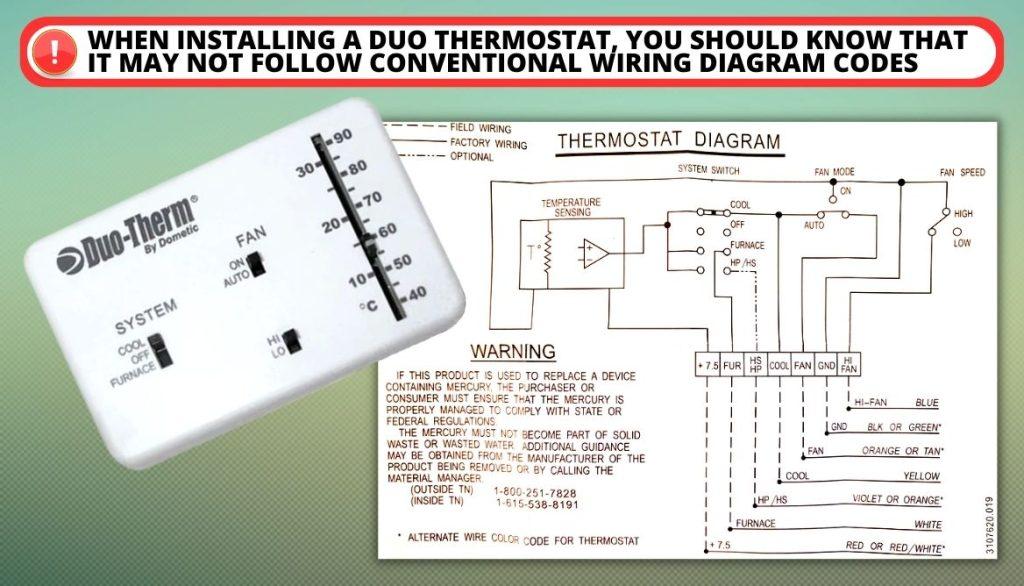
When installing a Duo thermostat, you should know that it may not follow conventional wiring diagram codes. Learning which wires to put in their correct and good places takes a lot of work. The white wire is usually neutral, while the black one can be hot depending on the wiring system.
When connecting the cables, take extra care to ensure that they are in the right place, or else your new or old thermostat won’t work correctly.
4. Use The Right Tools
Using suitable equipment types is essential for correctly wiring a Duo therm thermostat at good places. You may only need a flathead screwdriver to complete the job, but having a multimeter on hand is also recommended.
After making the connections, use the meter to test whether the wires carry the right amount of power. This event will help ensure the thermostat works correctly and accurately controls your home’s temperature.
5. Do A Test
Once you have finished connecting the cables to your Duo therm thermostat wiring diagram, testing the wires and voltage is always a good idea. If it isn’t, you may need to trace your steps and double-check that each wire is in the correct place.
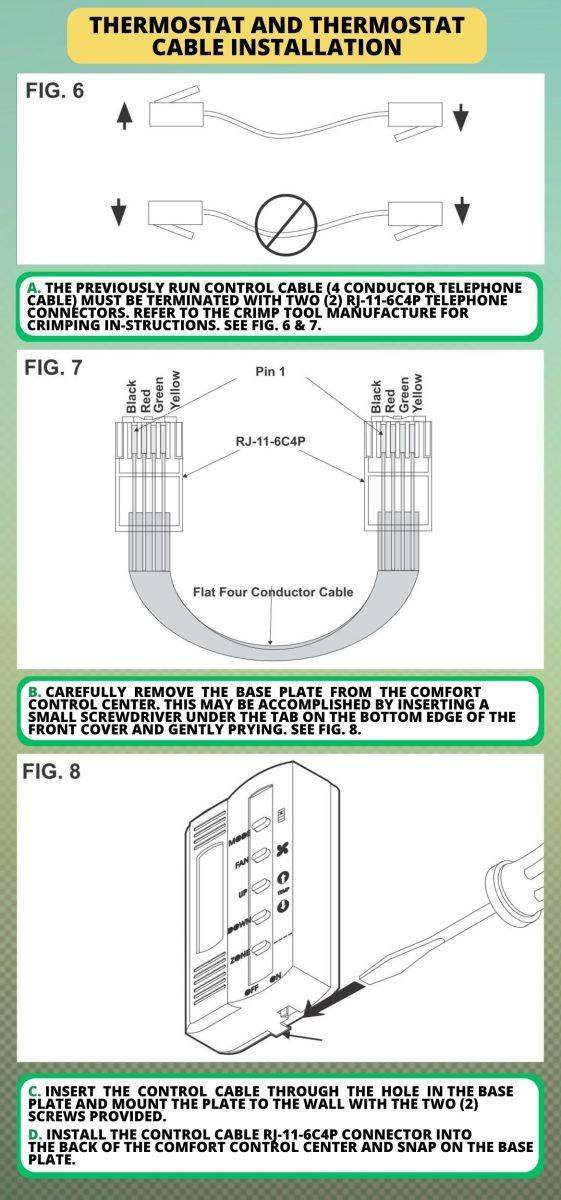
6. Find A Tutorial
When wiring a Duo Therm thermostat, sometimes words on a page just aren’t enough. Visual tutorials can be helpful as they better understand what needs to be done and how to do it.
Use our wiring diagrams and tips or look for online tutorials that provide step-by-step instructions on installing the thermostat and how to wire it properly.
This can make the wiring diagram process much easier and faster than figuring it out from text instructions.
7. Make Sure The Power Is Off
Safety is always the priority when working with electricity, so you must turn off the power before working with your Duo therm thermostat wiring diagram.
Furthermore, if the faulty connections are made while the emphasis is on, it can cause irreparable damage to the Duo therm thermostat. So, before starting any work, take the necessary steps to ensure that the power is off and stays off until the job is completed.
FAQs
Is Dometic And Duo Therm The Same?
Yes, Dometic and Duo Therm are the same. The Duo is a brand name owned by Dometic, one of the leading manufacturers of RV and camper appliances. Their products, like air conditioners, refrigerators, and furnaces, are all branded as Duo Therm.
How Do You Reset A Dometic Duo Therm Thermostat?
To reset a Dometic Duo therm thermostat, disconnect the power, then press and hold down the reset button for five seconds until the display is reset. Finally, switch the power back on to complete the reset process.
Does The Dometic Duo Therm Have A Heat Pump?
Yes, the Dometic Duo Therm is equipped with a heat pump. The heat pump is designed to extract heat from the outside environment and transfer it into your RV, providing efficient heating even in cold temperatures.
Why Does My Dometic Thermostat Not Work?
If your Dometic thermostat wiring diagram is not working, it could be due to a few possible issues. The most common cause is that the thermostat’s batteries are dead and need to be replaced, or the settings may be incorrect for the unit to operate correctly. Other possible causes may include damaged wires, faulty sensors, and blocked airflow.
Can You Replace A Dometic Analog Thermostat With A Digital One?
Yes, you can readjust your Dometic analog thermostat with a digital one. Just remove the existing analog thermostat from the wall and replace it with a compatible digital model.
Can I Replace Dometic AC With Coleman?
Yes, it is possible to replace them with each other. Coleman offers a wide selection of models compatible with Dometic units, making finding the perfect fit for your RV. Even more than that, you may need to purchase adapter kits to ensure the new Coleman air conditioner fits appropriately in the existing space.
Conclusion
The Duo Therm By Dometic Wiring Diagram is an important thing to understand your RV’s heating and cooling system. When you set up your RV systems follow the steps outlined in this article and you will be sure to get the job done right.
What problem did you have with your Duo Therm and how did you solve this? We’d love to hear about your experience, so please comment below and let us know how it went!

I`m a current Law Enforcement Officer working within the Counterterrorism Bureau in New York State. I have been Camping for over 20 years. My styles of camping include tent, car, truck, van, and RV travel trailer. I have a YouTube channel where I teach all types of camping with an entertaining method: https://youtube.com/@TheSmallsRVAdventures